
Remember the first time you bit into a cronut and experienced that perfect marriage of flaky croissant layers and donut sweetness? Yeah, me too. Life-changing.
But when the craving hits at midnight and the bakery’s closed, what’s a cronut lover to do? Turns out, making these magical pastries at home isn’t as impossible as you might think.
I’ve spent three weekends perfecting a homemade cronut recipe that delivers that same mind-blowing experience without requiring pastry chef credentials. You’ll get that perfect golden exterior, those distinct layers, and that unmistakable buttery flavor.
But here’s the thing about cronuts that most home bakers get completely wrong…
The History and Magic of Cronuts

What Makes Cronuts Special
Ever had that first bite of a cronut? It’s like your taste buds hit the lottery.
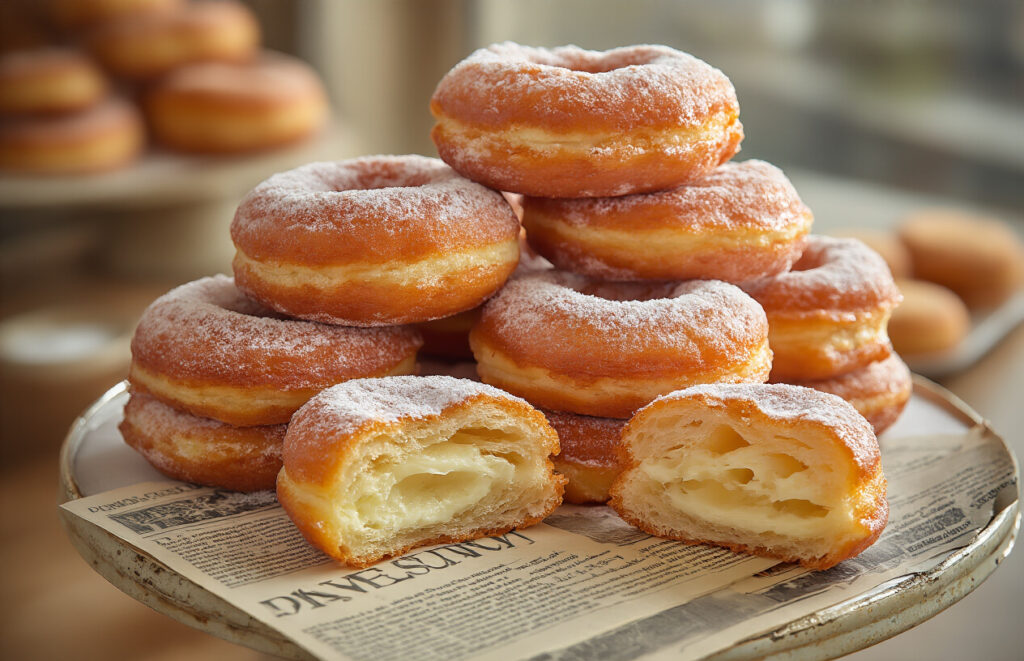
The cronut isn’t just another pastry – it’s the rebellious love child of a croissant and donut that broke all the rules. Flaky, buttery layers wrapped in a sweet, fried exterior. Yeah, it’s as good as it sounds.
What makes them magical is the texture contrast. The outside gives you that satisfying donut crunch while the inside stays delicately layered like a proper croissant. Then there’s the filling – usually a silky pastry cream that oozes out with each bite.
Most bakeries add their signature twist with glazes, sugar coatings, or toppings that change with the seasons. One bite sweet, next bite savory, and somehow perfectly balanced throughout.
The Original Cronut Story
Back in 2013, pastry chef Dominique Ansel dropped this bombshell on New York City. The guy spent two months perfecting the recipe before unleashing it on his bakery customers.
Nobody saw it coming. Within days, lines wrapped around the block with people waiting 2+ hours just for a taste. Scalpers even started flipping cronuts for $100 a pop on the black market. For a pastry!
Ansel trademarked the name “Cronut” faster than you can say “viral sensation,” forcing imitators to come up with creative alternatives like “dossants” and “cro-dos.”
Why Homemade Cronuts Can Be Just as Good
The secret’s out – you don’t need a fancy culinary degree to make amazing cronuts at home.
Store-bought cronuts often sit around for hours, losing that perfect texture. When you make them yourself, you control exactly when they’re fried and filled – meaning peak freshness every time.
Home bakers also get creative freedom. Want maple bacon cronuts? Coffee-infused filling? A salted caramel drizzle? Your kitchen, your rules.
Sure, they take some effort, but nothing beats serving warm, homemade cronuts to wide-eyed friends who thought this was strictly bakery territory. Trust me, they’ll think you’re some kind of pastry wizard.
The best part? Making a dozen at home costs about the same as buying two at a specialty bakery. More cronuts, more happiness – simple math.
Essential Ingredients for Perfect Cronuts

A. Flour Selection and Quality
Getting your flour right is make-or-break for cronuts. You need a high-protein flour – bread flour with at least 12% protein content is your best bet. The extra protein means more gluten, which gives your cronuts those beautiful, defined layers.
Don’t just grab whatever’s on sale. The cheap stuff often lacks consistency and might leave you with dense, disappointing results. If you’re serious about cronuts, splurge on King Arthur or Bob’s Red Mill. These brands maintain strict standards that make a huge difference.
Some home bakers swear by mixing their flours – try 80% bread flour with 20% pastry flour for that perfect balance between structure and tenderness.
B. Butter Choices That Make a Difference
Not all butter is created equal, folks. European-style butter (like Kerrygold or Plugra) contains higher butterfat – we’re talking 82-84% versus the standard 80%. Those extra percentage points translate to richer flavor and better lamination.
Unsalted butter is non-negotiable here. You need complete control over the salt content.
The real trick? Temperature management. Your butter needs to be pliable but cold – around 60°F is the sweet spot. Too warm and it melts into the dough; too cold and it breaks through the layers.
| Butter Type | Butterfat % | Best For |
|---|---|---|
| European | 82-84% | Luxury cronuts with distinct layers |
| American | 80% | Budget-friendly option |
| Cultured | 82-86% | Extra tangy, complex flavor |
C. Secret Flavoring Agents
The magic of cronuts isn’t just in their structure – it’s in those subtle flavor notes that make people close their eyes when they take a bite.
Vanilla bean paste (not extract) adds visible flecks and deeper flavor. Orange blossom water or a touch of cardamom gives that “what am I tasting?” quality that keeps people coming back.
Don’t underestimate the power of salt, either. Diamond Crystal kosher salt distributes beautifully through dough without dissolving too quickly.
And here’s something the pros don’t tell you: add a tablespoon of honey to your dough. It aids browning, extends shelf life, and adds complexity without making things obviously sweet.
D. Optional Add-ins for Customization
This is where you make cronuts truly yours. Consider:
- Citrus zest (orange or lemon) mixed into your sugar coating
- Infused syrups for soaking (think rose water, maple, or coffee)
- Specialty chocolate for fillings (single-origin gives distinct flavor profiles)
- Nut pralines for texture contrast
The secret to professional-level customization? Restraint. Pick one dominant flavor and one accent. More than that, and you’ve got a muddled mess instead of a signature cronut.
Try unexpected combinations: black sesame with white chocolate, or brown butter with sage. These unconventional pairings are what separate good cronuts from unforgettable ones.
Equipment You’ll Need

Must-Have Kitchen Tools
Making cronuts isn’t rocket science, but you’ll need a few reliable tools to nail that perfect texture and shape. First up, grab a heavy-duty stand mixer with a dough hook attachment. Trust me, hand-kneading laminated dough is a workout you don’t want.
You’ll also need:
- A rolling pin (preferably marble or wood for even pressure)
- Digital kitchen scale for precise measurements
- Deep-fry thermometer to maintain the perfect oil temperature
- Large, heavy-bottomed pot or Dutch oven for frying
- Circular cookie cutters (3-4 inch diameter for the outer shape and 1 inch for the hole)
- Cooling rack to drain excess oil
- Pastry bags with various tips for filling
Nice-to-Have but Not Essential Gadgets
Want to level up your cronut game? These tools aren’t deal-breakers but will make your life easier:
- Bench scraper for handling the dough
- Silicone baking mats for rolling out dough without sticking
- Electric deep fryer with temperature control
- Pastry brush for glazing
- Instant-read thermometer for checking doneness
- Dough docker to prevent air bubbles
Alternatives for Specialized Equipment
No fancy kitchen setup? No problem! These hacks work surprisingly well:
| Specialized Tool | Simple Alternative |
|---|---|
| Stand mixer | Large bowl and wooden spoon (requires elbow grease!) |
| Deep-fry thermometer | Test oil with a bread cube (should brown in 60 seconds at 350°F) |
| Pastry bags | Ziplock bag with corner snipped off |
| Dough docker | Fork pricked across the surface |
| Marble rolling pin | Wine bottle (labels removed and washed) |
Don’t skip making cronuts just because you lack the fancy gear. The DIY alternatives might take a bit more effort, but they’ll get you those flaky, delicious results just the same.
Step-by-Step Cronut Dough Preparation

A. Mixing the Perfect Dough
The secret to amazing cronuts starts with the dough. Don’t be intimidated – this isn’t rocket science. Mix 4 cups of bread flour, 1/3 cup sugar, 2 1/4 teaspoons yeast, and 1 teaspoon salt in a bowl. In another bowl, combine 1 cup warm milk, 2 beaten eggs, and 1 teaspoon vanilla extract.
Pour the wet into dry ingredients and mix until just combined. The dough should be slightly sticky but manageable. If it’s too wet, add flour a tablespoon at a time. Too dry? A splash of milk works wonders.
Knead for about 5 minutes until smooth. You’re not looking for super-elastic like bread dough – stop before you get there.
B. Mastering the Lamination Process
This is where cronuts get their signature flaky layers. Take 1 1/2 cups cold butter and pound it between parchment paper into a 6×6 inch square.
Roll your dough into a 10×10 inch square. Place the butter in the center at a diagonal. Fold the corners of dough over the butter like an envelope.
Now the fun begins! Roll this package into a rectangle about 12×18 inches. Fold it in thirds like a letter. That’s your first turn. Wrap in plastic and chill for 1 hour.
Repeat this rolling and folding process twice more, chilling between each turn. You’ll end up with dozens of buttery layers that’ll puff up gorgeously.
C. Proper Resting and Proofing Times
Patience pays off big time with cronuts. After your final fold, refrigerate the dough overnight. Seriously, don’t skip this step. The gluten needs to relax and the butter needs to chill.
The next day, roll the dough to 1/2-inch thickness and cut into donut shapes. Let these proof at room temperature for 1-2 hours until noticeably puffy. They won’t double in size like bread – they’ll just look slightly inflated.
The proofing environment matters. Aim for around 75°F with some humidity. Too cold? They won’t rise. Too hot? The butter melts and ruins those perfect layers.
D. Troubleshooting Common Dough Issues
Butter leaking out? Your dough’s too warm. Pop it back in the fridge for 20 minutes.
Not getting distinct layers? You might be rolling too thin or not chilling enough between turns.
Dough tears easily? The gluten is overdeveloped. Next time, handle more gently and don’t overknead.
Cronuts not rising during proofing? Your yeast might be dead. Test it by mixing with warm water and sugar – it should foam within 10 minutes.
Dense fried cronuts? You probably underproofed. Give them more time to puff up before frying.
E. Make-Ahead Options for Busy Bakers
The beauty of cronut dough? You can freeze it after the final fold for up to a month. Wrap it tightly in plastic, then foil.
Thaw frozen dough overnight in the refrigerator before rolling and cutting.
You can also freeze cut, unproofed cronuts. Arrange them on a baking sheet, freeze until solid, then transfer to freezer bags. Thaw in the refrigerator overnight, then proof as usual.
For a shorter make-ahead option, complete all steps up to cutting, then refrigerate the cut shapes overnight. The slow, cold proof actually improves flavor.
Frying Your Cronuts to Perfection

Oil Temperature Control Techniques
Getting the oil temperature right is make-or-break for cronuts. Too cold? You’ll end up with greasy, soggy pastries. Too hot? Burnt exterior with raw dough inside. Yikes.
Grab a candy thermometer—seriously, don’t try this without one. You’re aiming for 350°F (175°C), the sweet spot where cronuts fry evenly.
Heat your oil gradually. Cranking the heat to high will create hot spots that burn your precious cronuts. If you notice the temperature climbing too high, just add a small amount of fresh oil to cool it down.
Between batches, give the oil time to recover its temperature. Rush this step and you’ll wonder why your second batch looks nothing like the first.
Timing for Golden-Brown Results
Cronuts need exactly 90 seconds per side—not a guess, but a rule. Set a timer if your memory is anything like mine.
Look for that rich amber color developing. When the edges start turning golden, you’re on track.
The cronut should float in the oil. If it’s sitting at the bottom looking sad, your oil isn’t hot enough.
When you think they’re done, lift one with a slotted spoon and check the color along the ridges. That’s where you’ll see if they’re truly ready.
Safety Tips for Frying
Never fill your pot more than halfway with oil. Cronuts expand, and that oil will bubble up.
Keep a metal lid nearby. If flames appear (and I’ve been there), slide the lid over the pot—don’t drop it—to cut off oxygen.
Use long tongs or a spider strainer to keep your hands far from the hot oil. Those little oil splatters hurt way more than you’d expect.
Have a baking sheet lined with paper towels ready before you start frying. When those cronuts are golden, you need to move fast.
Delicious Finishing Touches

A. Classic Glazes That Wow
Nothing beats that sweet, shiny glaze that makes cronuts irresistible. The classic vanilla glaze is stupid-simple – just mix powdered sugar, milk, and vanilla extract until smooth. But don’t stop there! Try these crowd-pleasers:
- Maple glaze: Replace vanilla with maple syrup for a breakfast vibe
- Chocolate glaze: Add cocoa powder and a touch of espresso to intensify flavor
- Lemon glaze: Mix in fresh lemon zest and juice for a tangy kick
Pro tip: Dip only the tops of your cronuts while they’re still slightly warm, not hot. This helps the glaze set perfectly without melting completely.
B. Creative Filling Ideas
The magic of cronuts? That surprise inside! Here are some fillings that’ll make your friends think you robbed a bakery:
- Vanilla bean pastry cream (the classic)
- Chocolate ganache (use real chocolate, not chips)
- Dulce de leche (store-bought works great)
- Berry compote (cook down fresh berries with a bit of sugar)
- Coffee cream (infuse pastry cream with espresso)
Fill your cronuts using a piping bag with a long tip. Insert it from the side in 3-4 spots around the cronut, gently squeezing until you feel slight resistance.
C. Topping Combinations for Extra Flair
Your cronuts deserve more than just glaze! Try these combo ideas:
- Salted caramel glaze + crushed pretzels
- Chocolate glaze + toasted coconut flakes
- Maple glaze + crumbled bacon (yes, BACON)
- Vanilla glaze + fruity cereal (channel your inner kid)
- Cinnamon sugar + toasted pecans
Apply toppings immediately after glazing so they stick properly.
D. Presentation Tips for Instagram-Worthy Cronuts
Want those likes? Your cronuts need to look as good as they taste:
- Stack ’em high on a vintage cake stand
- Dust with powdered sugar right before serving
- Serve on colorful plates that contrast with your glaze
- Add edible flowers or mint leaves for a pro touch
- Cut one in half to show off those beautiful layers
Lighting matters too! Natural window light shows off those flaky layers better than your kitchen overhead lights ever will. And remember – a slightly messy presentation with dripping glaze looks more authentic and appetizing than perfect ones.
Storage and Serving Suggestions

A. Keeping Cronuts Fresh
Those gorgeous cronuts you just made? They’re at their absolute best within 6 hours of frying. But who can eat a dozen cronuts that fast? (Actually, don’t answer that.)
Store your cronuts in an airtight container at room temperature for up to 2 days. The critical mistake most people make is refrigerating them – don’t do it! The fridge dries them out faster than you can say “stale pastry disaster.”
If you’ve added cream filling, the rules change. Those babies need refrigeration and will last about 24 hours before the filling starts breaking down the delicate layers.
B. Reheating Methods
Day-old cronuts need a little revival. Here’s how to bring them back to life:
- Oven method (best option): Preheat to 300°F, place cronuts on a baking sheet for 4-5 minutes. This restores that magical crisp exterior.
- Air fryer hack: 2 minutes at 250°F works miracles for small batches.
- Microwave emergency: 10-second bursts only, watching carefully. It won’t restore crispness but helps with texture.
Whatever you do, never reheat a filled cronut – remove any filling first and add fresh after reheating.
C. Perfect Pairings for Your Cronut Experience
Cronuts aren’t just breakfast – they’re an experience. Take yours to the next level with:
- Coffee: A strong espresso or cappuccino cuts through the sweetness
- Milk: Cold whole milk is surprisingly perfect (oat milk works beautifully too)
- Ice cream: Vanilla bean on a slightly warm cronut? Game-changer.
- Fresh berries: The tartness balances the richness
For brunch, serve cronuts with a champagne cocktail. The bubbles complement the buttery layers in ways you won’t believe until you try it.
Conclusion

Mastering the art of homemade cronuts is within your reach with the right ingredients, equipment, and techniques. From creating the perfect laminated dough to achieving that golden-brown exterior through proper frying, every step contributes to creating this delightful pastry that combines the best of croissants and donuts.
Don’t be afraid to experiment with different flavor combinations for your fillings and toppings once you’ve mastered the basics. Whether enjoyed fresh from the fryer or stored properly for later, these homemade cronuts will impress family and friends with your baking prowess. Try this recipe this weekend and discover the joy of creating this famous pastry in your own kitchen!